目錄 1、首先配置好路由地址 2、然后實(shí)現(xiàn)頁面入口 3、然后實(shí)現(xiàn)AAAAAA和BBBBBB頁面 有時(shí)遇到一些需求,需要實(shí)現(xiàn)左邊側(cè)邊欄為父級(jí)菜單,右側(cè)內(nèi)容區(qū)的頂部為子級(jí)菜單,以及其底部為子級(jí)
目錄
- 1、首先配置好路由地址
- 2、然后實(shí)現(xiàn)頁面入口
- 3、然后實(shí)現(xiàn)AAAAAA和BBBBBB頁面
有時(shí)遇到一些需求,需要實(shí)現(xiàn)左邊側(cè)邊欄為父級(jí)菜單,右側(cè)內(nèi)容區(qū)的頂部為子級(jí)菜單,以及其底部為子級(jí)菜單對應(yīng)的模塊內(nèi)容。
如此,簡單實(shí)現(xiàn)如下:
1、首先配置好路由地址
【如:/src/router/index.ts】
import { createRouter, createWebHashHistory, RouteRecordRaw } from 'vue-router'
const routes: Array<RouteRecordRaw> = [
  {
    path: '/',
    redirect: '/xxxxxx'
  },
  {
    path: '/xxxxxx',
    name: '帥龍之龍',
    component: () => import('@/views/XXXXXX/index.vue'),
    children: [
      {
        path: '/xxxxxx/aaaaaa',
        name: '赤龍神帝',
        components: { AAAAAA: () => import('@/views/XXXXXX/AAAAAA/index.vue') },
        children: []
      },
      {
        path: '/xxxxxx/bbbbbb',
        name: '待定欄目',
        components: { BBBBBB: () => import('@/views/XXXXXX/BBBBBB/index.vue') },
        children: [],
      },
    ]
  }
]
const router = createRouter({
  history: createWebHashHistory(),
  routes
})
export default router
2、然后實(shí)現(xiàn)頁面入口
【如:/src/views/XXXXXX/index.vue】
<template>
  <div class="index-page">
    <div class="index-page-navbar">
      <div class="index-page-navbar-item" :class="activePage == 'AAAAAA' ? 'index-page-navbar-active' : ''" @click="handleNavbarItemClick('AAAAAA')">
        <span>赤龍神帝</span>
      </div>
      <div class="index-page-navbar-item" :class="activePage == 'BBBBBB' ? 'index-page-navbar-active' : ''" @click="handleNavbarItemClick('BBBBBB')">
        <span>待定欄目</span>
      </div>
    </div>
    <div class="index-page-content">
      <router-view name="AAAAAA" v-if="activePage == 'AAAAAA'" />
      <router-view name="BBBBBB" v-if="activePage == 'BBBBBB'" />
    </div>
  </div>
</template>
<script>
export default {
  data () {
    return {
      // 當(dāng)前激活的頁面
      activePage: '',
    }
  },
  watch: {
  },
  created() {
    this.init()
  },
  mounted() {
    // 設(shè)置頁面標(biāo)題
    document.title = '帥龍之龍'
  },
  methods: {
    /**
     * 獲取初始化參數(shù)
     */
    async init() {
      this.activePage = 'AAAAAA'
      const query = this.$route.query
      this.handleMatchRouter(this.activePage)
    },
    /**
     * 激活頁面句柄
     */
    handleActivePageChange(activePage) {
      // 點(diǎn)擊 el-tab 頁面時(shí),將 this.$route.query 置為 {}
      this.$route.query = {}
      this.handleMatchRouter(activePage)
    },
    /**
     * 激活頁面句柄
     */
    handleMatchRouter(activePage) {
      const path = this.$route.path
      const b = path.toLowerCase().includes(activePage.toLowerCase())
      if (activePage == 'AAAAAA') {
        if (!b) {
          this.$router.push({
            path: '/xxxxxx/aaaaaa',
            query: this.$route.query,
          })
        }
      } else if (activePage == 'BBBBBB') {
        if (!b) {
          this.$router.push({
            path: '/xxxxxx/bbbbbb',
            query: this.$route.query,
          })
        }
      }
    },
    /**
     * 點(diǎn)擊側(cè)邊導(dǎo)航欄
     */
    handleNavbarItemClick(item) {
      this.activePage = item
      this.$route.query = {}
      this.handleMatchRouter(item)
    },
  }
}
</script>
<style lang="less" scoped>
  .index-page {
    display: flex;
    flex-direction: row;
    width: 100%;
    height: 100%;
    position: relative;
    background-color: #fff;
    .index-page-navbar {
      flex: none;
      width: 40px;
      height: 100%;
      border-right: 1px solid #dfe1e6;
      .index-page-navbar-item {
        display: grid;
        width: 100%;
        height: 150px;
        background-color: #fff;
        border-bottom: 1px solid #dfe1e6;
        writing-mode: tb-rl;
        text-align: center;
        align-items: center;
        user-select: none;
        cursor: pointer;
        transition: all ease 0.3s;
        span {
          color: #303133;
          font-size: 14px;
          letter-spacing: 1.5px;
        }
      }
      .index-page-navbar-active {
        background-color: #5e7ce0;
        span {
          color: #fff;
        }
      }
    }
    .index-page-content {
      flex: 1;
      position: relative;
      height: 100%;
      margin: 0;
      padding: 0;
      overflow: hidden;
    }
  }
</style>
3、然后實(shí)現(xiàn)AAAAAA和BBBBBB頁面
【如:/src/views/XXXXXX/AAAAAA/index.vue? ? /src/views/XXXXXX/BBBBBB/index.vue】
<template>
  <div style="width: 100%; height: 100%; display: grid; align-items: center; text-align: center">
    <span style="color: #303133; font-size: 14px;">HelloWorld!...</span>
  </div>
</template>
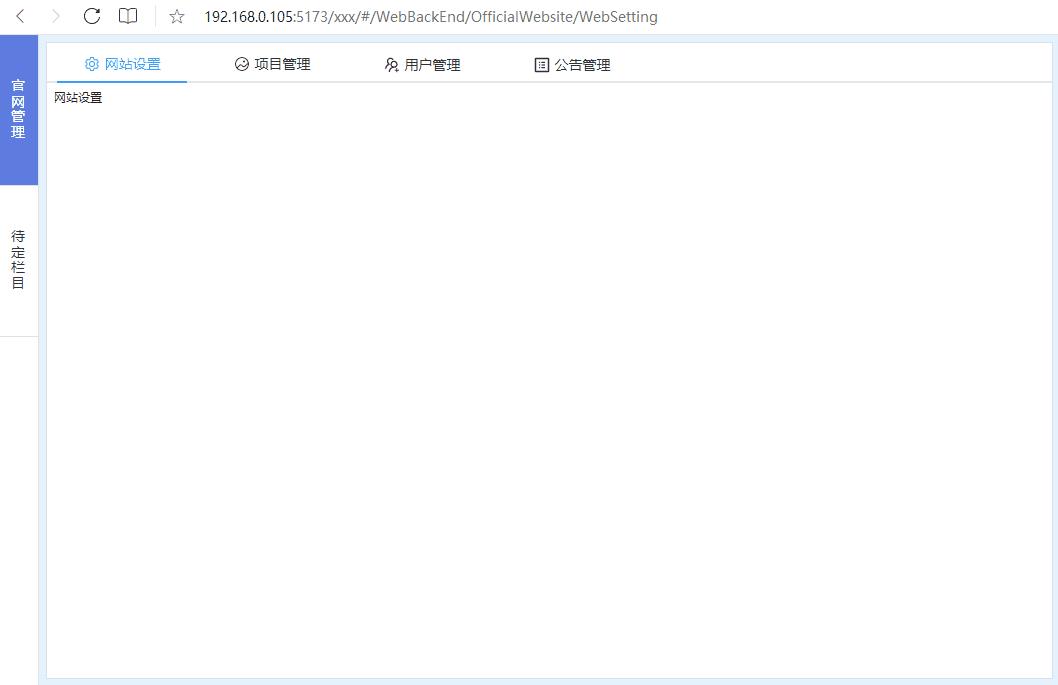
4、效果如下:~
到此這篇關(guān)于Vue3實(shí)現(xiàn)簡約型側(cè)邊欄的示例代碼的文章就介紹到這了,更多相關(guān)Vue3 側(cè)邊欄內(nèi)容請搜索技圈網(wǎng)以前的文章或繼續(xù)瀏覽下面的相關(guān)文章希望大家以后多多支持技圈網(wǎng)!
【本文由: 阜寧網(wǎng)站制作 http://www.1234xp.com/funing.html 復(fù)制請保留原URL】聲明:所有內(nèi)容來自互聯(lián)網(wǎng)搜索結(jié)果,不保證100%準(zhǔn)確性,僅供參考。如若本站內(nèi)容侵犯了原著者的合法權(quán)益,可聯(lián)系我們進(jìn)行處理。